Showing posts with label SharePoint 2013. Show all posts

Thursday, June 16, 2016

The Phantom Workflow


If you’re a fan of the original Star Wars trilogy, you may have wondered “Where did the Storm Troopers come from?” As a child, I thought they were robots.

Similarly, a customer and I recently came across a phantom workflow and wondered “Where is this workflow running from?”

The customer, who is a site collection administrator, created a list on one of his subsites. He then added a Nintex workflow to the list. Because he needed to clone the structure for other lists, he saved the list as a template and created a new list from the template.

Once he started adding entries to the new list, the customer noticed that the workflow attached to the original list was running on the new list. However, when he went to Manage Nintex Workflows, there were no workflows for the new list. So he let the phantom workflow run, until he needed to change the wording in the email notification. So he asked me how he could access the phantom workflow.

Baffled by the mystery, I reached out to my friends Vadim Tabakman, a Nintex Evangelist, and John White, a Nintex expert user (and the Obi-Wan Kenobi of Power BI). They explained that the list template copied over the SharePoint pieces for the workflow. While the Nintex workflow was listed in SharePoint Designer (SPD), it could not be edited (nor would you ever edit a Nintex workflow in SPD).

There was one solution. First, I informed the customer that deleting the phantom workflow would also delete all of its workflow history. Next, using SharePoint Designer, I deleted the workflow. (Note: If the original workflow for the original list was called Workflow1, then the phantom workflow associated with the new list would be called Workflow2.) After deleting the correct workflow, I exported the original Nintex workflow to a .nwf file. Then I imported the .nwf file into a new, blank workflow attached to the new (cloned) list. At this point, the customer was able to modify the email notification in the new list’s workflow, without affecting the email notification in the original list’s workflow.

Now that we know where the phantom workflow (and the original Storm Troopers) came from, you may be wondering “What if I’m not using Nintex?” So I tested, and yes, a workflow created in SharePoint Designer could also appear as a phantom workflow.

Tuesday, May 12, 2015

Error Saving List as Template

I have full control. So why can’t I save a list (or library) as a template?

As the owner of a sub-site, you have full control. You can create a list and get to list settings. But when you click Save List as Template, you get an error.

 
The reason is that list templates are stored in the List templates gallery—which is a document library—on the root of the site collection. If you don’t have Full Control there, you can’t save to the gallery. Thus, you can’t save a list as a template.

You have two options. First, you can obtain the necessary permissions to the root of the site collection. If that’s not possible, then your site collection administrator will have to create the list template for you. Perhaps with enough requests, you’ll get the permissions you desire.

Friday, August 22, 2014

Failed to Decline Request

Hint: If you'd prefer to watch the Webucator video on this issue, scroll to the bottom of this post.

Recently, I noticed that the option to approve a request for access to a site was grayed out. I had full control over the site; so I knew it wasn’t a permissions issue with my account. The reason was that there was no group selected. Instead, the dropdown had “Select a group or permission level.” Once I selected a group, I was able to approve or decline the request.

 
Then a colleague and I encountered the “Failed to decline request” error. We both had full control over the site, but neither of us could decline a user’s request for access to the site.


Since selecting a group had fixed my approve problem, I decided to apply the same logic to this decline issue. Low and behold, after selecting a group, my colleague and I were able to decline the request.
 
After experiencing these two issues, I finally recognize the importance of having a default group.
 
To set the default group for a site:

1. Navigate to the site
2. From the Settings wheel, click Site settings
3. Under Users and Permissions, click People and Groups


4. Click the group that will be the default
5. Click Settings and select Make Default Group


6. Click OK to make the current group the default members group


Update: Thanks to my friends at Webucator, you can now watch a video that walks you through identifying and resolving the Failed to Decline Request issue.


Webucator offers customized SharePoint training for private groups as well as public online SharePoint classes and self-paced SharePoint courses for individual students. Check out their website for more details about their SharePoint training.


Sunday, August 10, 2014

Document Sets: A Step-by-Step Guide

My latest work project was to build a document management solution using out-of-the-box features in SharePoint 2013. During my research, I began to feel that many of the available features are underutilized. Of all the features, document sets were my favorite. A document set is often described as a folder on steroids with the attributes of an item. In actuality, a document set is a content type.

While document sets are a somewhat simple concept, there is a certain order that you must follow to build a document set efficiently. Below is the order followed by a detailed explanation of each step.
  1. Create site columns and content types.
  2. Assign site columns.
  3. Publish content types.
  4. Run Content Type Subscriber timer job.
  5. Create document set content types.
  6. Define document set settings and assign additional site columns.
  7. Publish document set content types.
  8. Run Content Type Subscriber timer job.
  9. Assign Document Set Content Type to document library.
  10. Create a document set.
Step 1 – Create Site Columns and Content Types
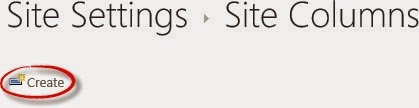
Before you create the document set, you will need to make sure your desired content types and site columns already exist. Both are created from Site Settings, either at the content type hub or site level. I prefer to create them within my content type hub so that they can be used throughout my SharePoint environment, not just in one site collection.


Step 2 – Assign Site Columns
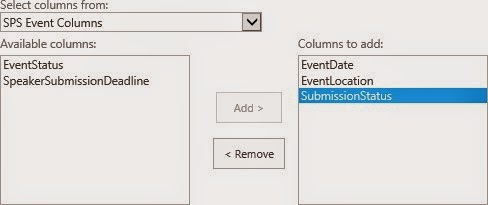
If you create a new content type, click Add from existing site columns to assign site columns to capture specific metadata. You can use existing site columns, also created within your content type hub, or you can create site columns at the site level. Alternatively, you can add site columns to the document set in which the content type will be allowed. The benefit of adding the site columns to the document set or content type is only having to add them once.
 
Step 3 – Publish Content Types
When you have your content type just the way you want it, don’t forget to publish it. Click Manage publishing for this content type, select the radio button for Publish (or Republish if you are updating the content type with changes), and click OK.
 
Step 4 – Run Content Type Subscriber Timer Job
Published (or republished) content types created in the content type hub will become available for use once the Content Type Subscriber timer job runs. If you have SharePoint on-premises and access to Central Administration, you can manually run this timer job. Go to Monitoring > Review Job Definitions and click Content Type Subscriber. You will see its schedule and the last time it ran. Rather than waiting for the next scheduled run, click Run Now to start the timer job.
 
 
Note: If you have SharePoint Online or Office 365, you do not have access to the timer job in Central Administration. Instead, go to Site Settings > Content Type Publishing within your content type hub, mark the checkbox for Refresh all published content types on next update, and click OK.


Step 5 – Create Document Set Content Types
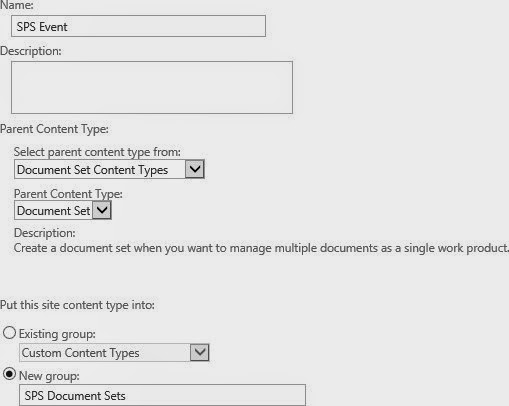
Document sets are created in Site Settings > Site Content Types. If you create the document set within your content type hub, it can be used throughout all of your site collections. The only real decisions when creating the document set are what to name it and where to put it because the Parent Content Type will logically be Document Set.


Step 6 – Define Document Set Settings and Assign Additional Site Columns
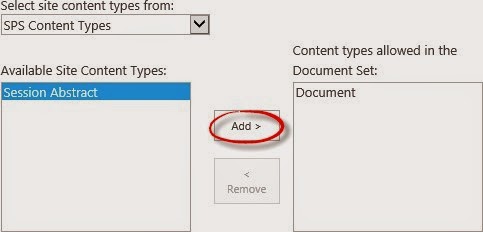
Now you can define your document set. Start by clicking Document Set settings. First, choose which content types are allowed in the document set. Filter the available site content types by selecting the group into which you put the new content types. Then highlight the desired content type and click Add. If necessary, you can change the group and add additional content types without saving between groups.

If you do not want the default content type, you must delete it from the Default Content before you can remove it from the content types allowed in the document set.
 
For me, the most attractive attribute of the document set was the ability for items in the document set to inherit the metadata assigned at the document set level. This is achieved through shared columns. In the Document Set settings, mark the checkbox for each column that documents should inherit.


Document sets also have a welcome page that can display its shared columns. Highlight the column to be shared and click Add.

 
If you make changes to the site columns, such as adding more or rearranging the order, you may want to update the welcome page for document sets inheriting from your document set content type. Just mark the checkbox in the Document Set settings.
 

Another way to customize the document set is to add additional site columns. Click Add from existing site columns and follow the same process as outlined above in Step 2.
 
Step 7 – Publish Document Set Content Types
When your document set is ready, make sure you publish it. This is the same process that you did in Step 3 to publish the newly created content types.
 
Step 8 – Run Content Type Subscriber Timer Job
Just like step 4, you must run the Content Type Subscriber timer job from Central Administration, assuming you created your document sets within the content type hub. Alternatively, you can wait for the timer job to run on its normal schedule.
 
Note: For SharePoint Online or Office 365, you can return to Content Type Publishing, as mentioned in step 4.
 
Step 9 - Assign Document Set Content Type to Document Library
Now that your document set is available for use, you must assign it to the document library. First, go to Library Settings and click Advanced Settings. Select the Yes radio button for Allow management of content types. Click OK to save the changes.


Upon returning to the Document Library settings, scroll down to the Content Types section. First, click Add from existing site content types. Highlight the desired document set and click Add. Repeat until all of the desired document sets are listed under Content types to add and click OK.


Next, click Change new button order and default content type. If there are any content types that you do not want displayed on the new document menu, unmark the checkbox for those content types under Visible. Arrange the content types in the order in which they should appear on the new document menu by assigning the appropriate numerical value under Position from Top. The content type in the first position will become the default content type.


Step 10 - Create a Document Set
Navigate to the document library where the document set content type was enabled. From the ribbon, click Files and select the document set from the New Document menu.


Disadvantages of Document Sets
What don’t I like about document sets? First and foremost, you cannot create a view within a document set, thus preventing you from sorting, filtering, or grouping. Also, unless you disable the option to Make “New Folder” command available in the library’s Advanced Settings, you can create folders and subfolders within the document set. While I do not fully support the use of folders, another disadvantage of document sets (and document libraries) is that you cannot drag folders into the document set. (The workaround is to open the document library or document set using the Open with Explorer feature.)
 
More Advantages of Document Sets
Let’s end on a positive note. First, you can drag and drop up to 100 files into a document set. (If you don’t see drag files here, check your version of Internet Explorer and/or my blog post on Using Office 2010 with SharePoint 2013.) Because document sets are part of a document library, you can create views within the library. Those views do allow you to sort, filter, and group; and you can create a view that shows all the documents without folders. However, the document set will display as an item. You can also export the view to Excel, where you can do additional sorting and filtering.

Wrap Up
Document sets are a great way to promote metadata and replace folders without taking away any security features. By referring to document sets as special folders, users can maintain the comfort they have developed with folders while getting away from infinite levels of subfolders.
 
Additional Resources


Wednesday, February 26, 2014

Viva La SPC14!

In a few days, I'll be heading to Las Vegas for two conferences. First, I'll be attending the K2 User Conference at the Hard Rock Hotel on March 1 and 2. Then, I'll head over to the Venetian for the SharePoint Conference 2014. Both conferences will provide more knowledge than my brain can handle, but here's a brief look at what I'm looking forward to the most.
 
The K2 user conference is sold out. Thus, I expect to meet a lot of K2 users. Since I have not personally used K2 yet, I hope to learn how they are using K2, as well as picking up some general tips and best practices. I'm most excited about the Fast Forms session on Saturday, where I'll see how to build forms using K2. On Sunday, I'm looking forward to the Fast Workflow session, where I'll see, for the second time ever, how to build a K2 workflow. I don't expect to be a K2 expert at the end of the K2 user conference, but I do hope that I'll have a broader knowledge of K2 products.

The SharePoint Conference kicks off Sunday evening with a welcome reception. I anticipate that I'll see quite a few people I met at various SharePoint Saturday events last year. Many of them are SPC14 speakers, and I wish them well!

Monday begins with the keynote speeches, most notably (or infamously?) the Bill Clinton keynote. If Al Gore invented the Internet, then Bill Clinton invented SharePoint, right? I'll be sure to NOT wear a blue dress.

Once the breakout sessions start Monday afternoon, I'm going to be torn between the business (end) user track and the IT Pro track. To temporarily satisfy my dual personalities (I'm a Gemini), I have added two tracks to most time slots. When it's time to go to a session, I'll decide which one strikes my fancy at that particular moment. If I change my mind 10 minutes into the session, I'll know what my alternate choice was. Let's just hope they're located in close proximity. (If they're not, then I'll be breaking in my new shoes and gaining additional Fitbit steps.)

Are you going to the session on the retirement of InfoPath? I predict that this will be the most attended session of the entire conference (excluding keynotes). I'm thinking about going to a different session for a couple of reasons. First, everyone will be talking about what was announced during the session. Therefore, I can get all of the information second hand. Additionally, the session materials (and probably a recording of the session) will be available online after the conference. So I will have yet another opportunity to find out what the replacement for InfoPath is...first hand this time!

One way I plan to meet new people is to attend the two Women in SharePoint events. First, there will be an informal gathering at Sunday night's welcome reception. Then, on Wednesday, is the official Women in SharePoint lunch. (On MySPC, it's called Women in Technology Lunch.) The all-star panel includes Cathy Dew, Lori Gowin, Naomi Moneypenny, Laura Rogers, and Jennifer Mason. These ladies are sure to have some great stories and encouraging advice. If you're a woman in SharePoint, you should join us! Just put the session on your schedule. There's no extra fee to attend.

Another networking opportunity that isn't on the official schedule is the Netcast Hooligans breakfast on Wednesday. This is your chance to meet and dine with Todd Klindt, author, Netcast host, and SharePoint administrator extraordinaire. (Don't let his session on load testing with Visual Studio fool you into thinking he's a developer!)

If you're staying in Vegas Thursday night, be sure to register for and attend #ShareHofbrau. This is an annual, unofficial post-SPC dinner held at Hofbrau and organized by Corey Roth. I'll unfortunately miss this fantastic event because I'll be on a plane headed back to Houston.

For more ideas on what to expect at the SharePoint Conference, check out these blogs.
If you have a Twitter account, I suggest you save a search for #spc14 and follow @spconf, @spcpartypatrol, and @SharePointMadam. Yes, that last one is me. I'll be tweeting my SharePoint Conference experience throughout the days...and nights.

Those are my thoughts on SharePoint Conference 2014. Now it's time to pack. Wish me luck!

Friday, January 3, 2014

Integrating Yammer with SharePoint 2013

SharePoint 2013 has a Yammer app that can be installed to integrate the two products. If you are using a non-Microsoft supported app, such as Chrome or Firefox, typically you just need to sign into the Yammer app to make it work. However, if you are using Internet Explorer, especially IE11, you may need to make a few modifications to the Trusted Sites. Just follow these steps.


1.    In Internet Explorer, open Internet Options.

2.    Click on the Security tab.

3.    Click on Trusted Sites and then click Sites.

4.    Add the following four URLs:

·        https://*.assets-yammer.com

·         https://*.sharepoint.com

·         https://*.yammer.com


5.    After adding the last URL, click Close.

6.    Click Close.


You should now be able to log into the Yammer app for SharePoint 2013.

Thursday, January 2, 2014

Using Office 2010 with SharePoint 2013

If you are using Office 2010 with SharePoint 2013, you may have noticed two issues. First, “drag files here” is missing from your document libraries. Second, you may not be able to open Microsoft Office files from inside SharePoint because “some content or files on this webpage require a program that you don’t have installed.” Let’s examine and resolve each of these issues.


The ability to drag and drop files into a SharePoint 2013 document library is a new feature that requires some Office 2013 files to be installed on your computer. To obtain these files, you can install any Office 2013 program. If your organization is not ready to roll out Office 2013 enterprise wide, you can install Lync 2013 or SharePoint Designer 2013. Because SharePoint Designer is a powerful tool, only power users with appropriate training should use it to modify SharePoint sites. Through Central Administration, farm administrators who are worried about the unauthorized use of SharePoint Designer can control—at the web application level—which users are allowed to use the tool.
 
After installing an Office 2013 program to enable the drag and drop to a document library feature, users may not be able to open Office files—such as Word, Excel, or PowerPoint—in the client or desktop application. This is a known issue that is resolved by installing Service Pack 2 for Office 2010. Click here for the 32-bit version or click here for the 64-bit version of the Office 2010 Service Pack 2.

Monday, December 2, 2013

MDS Caused Error After Modifying List View

Should I deactivate Minimal Download Strategy (MDS) on a Team site that has Publishing features enabled? The answer is yes.
 
On October 15, I posted this question on SPYAM. Although I only received 3 responses, no one objected to the idea. I thus went into my client's SharePoint 2013 environment and deactivated MDS on all of the sites...or so I thought.
 
Minimal Download Strategy is a new feature in SharePoint 2013 that reloads only the parts of the page that have changed. MDS works well with Team sites and is automatically activated when you create a Team site. Unfortunately, it can cause the page to load twice on Publishing sites.

The reason we had Publishing features activated on Team sites was to make use of an app that we had downloaded from the SharePoint store. It worked fine on Team sites but gave us a 503 error on Publishing sites. Because we had a custom master page with custom CSS, we had built the main web app using the Publishing site template. To quickly get around the 503 error, we rebuilt the web app with the Team site template and manually activated the Publishing features.

A few weeks later, we noticed that some sites were throwing an error after changing the view in a list. The error always started with a number, but that number varied. The rest of the error was always the same, as seen in the example below.
 
86|pageRedirect|owssvr|http://webapp.clientname.com/dept/finance/acctg/Lists/icontacts/AllItems.aspx 

After much research and testing, my co-worker and I discovered the problem. The list view error was only occurring on the sites where MDS was (unintentionally) still enabled. By deactivating MDS on those sites, we eliminated the list view error. My co-worker's full explanation is below.

"The OWSSVR.dll is a Remote Procedure Call (RPC) component of SharePoint. It’s part of a web service, that among several other things, accesses list and library functions through CAML queries. In this case the Minimal Download Strategy (MDS) Feature uses this web service like an AJAX call to only refresh page level elements rather than the whole page itself. This is a way Microsoft tries to increase perceived page load performance.

"I found if we disable this feature the OWSSRV.dll 6500 error no longer occurs when saving List Views and I have not found any additional impact on disabling this feature."
 

Monday, November 18, 2013

Local Columns Not Associated with Custom Content Types

Recently, I was working with a client who just went live on SharePoint 2013. On a subsite of the home page, there is a document library containing forms and policies. To visually organize the library, I added a choice column called DocType. As you guessed, the choice types were Form and Policy. When I edited the properties of one of the documents, I noticed that the new column was not visible.

Further investigation revealed that the local column was associated with the original content type, Document, but not associated with the default (custom) content type, Client Document. The client is on the March 2013 Public Update. So I tested this functionality in a SharePoint 2013 RTM environment, and the local column did associate with the default (custom) content type as well as the original content type.

I had two friends test using the same steps. The friend who is also on SharePoint 2013 RTM had success in the local column associating with the default (custom) content type as well as the original content type. However, the friend who is on the August 2013 Cumulative Update did not have success. In her environment, the local column associated only with the original content type and not the default (custom) content type.
 
If you have a SharePoint 2013 environment that is on the October 2013 CU, I encourage you to test this functionality using the steps below and report your results in the comments section. The more attention we give this scenario, the more hope there is that it will be resolved in an upcoming hotfix or cumulative update.
 
Steps to Test in Your SharePoint 2013 Environment
1. In a document library, add a custom content type and make it the default content type. The original content type should still be associated with the library but not visible.
2. In the same document library, add a choice column to be used as local metadata. When creating the column, ensure that the checkbox for "Add to all content types" is marked.


3. In the Columns section of the Document Library Settings, notice that the local column is associated with the original content type but not the default (custom) content type.

4. Upload a document to the library.

5. Edit the properties of the document. Notice that the newly added column does not display.


Thursday, May 30, 2013

Access Apps for SharePoint 2013 - Part 3

If you couldn’t find an Access app template to suit your needs, then the SharePoint store may have a solution for you. (To find out if you have permission to install an app from the SharePoint store, check with your SharePoint administrator.) My favorite (and an easy) way to find the store is to go to http://office.microsoft.com/store. From the dropdown menu under Apps for Office and SharePoint, click on Apps for SharePoint.


You can use the navigation on the left to filter the displayed apps, or you can use the search box in the top right corner. For example, I searched on “Access” to see all of the Access apps currently available.


Since I was a corporate trainer for 11 years, I’m especially interested in the Training Management app. If you hover over an app, you’ll see its description. To purchase the app (even if it’s free), start by clicking on the app.


Once you click on the button to Add It, you’ll be prompted to confirm that you wish to add the app. Simply press the Continue button.


Now that you have acquired an app from the SharePoint store, you need to install the app on one or more of your SharePoint sites. First, navigate to the site where you want to add the app. From the getting started section of your site, click Add lists, libraries, and other apps.


In the section titled Apps you can add, you’ll see the app you just acquired. (You can also sort the apps by Name or page through the apps until you find the one you want to add.) To begin the app installation process, click on the app. You will be asked if you trust the app. Click Trust It to continue.


SharePoint then takes you to the Site Contents page, where you can see all of your lists, libraries, and apps. Locate your new app and click on it to open it. Just like with our custom web apps built from scratch and from a template, the Access app has a list view form and a datasheet view form for each table. You can add, edit, and delete data within the tables. However, depending on the app’s author, you may or may not be able to edit the tables in Access. For the Training Management Access app, there is no option to edit the tables. From a support perspective, that makes sense.

This post concludes my blog series on Access apps in SharePoint 2013. But wait – there’s more! Even though I promised you three parts, we haven’t looked at creating a table from an existing data source, such as an Excel file or a SharePoint list. Because this is a valuable option, I’ll do a bonus round to this blog series. Stay tuned!