Friday, August 22, 2014

Failed to Decline Request

Hint: If you'd prefer to watch the Webucator video on this issue, scroll to the bottom of this post.

Recently, I noticed that the option to approve a request for access to a site was grayed out. I had full control over the site; so I knew it wasn’t a permissions issue with my account. The reason was that there was no group selected. Instead, the dropdown had “Select a group or permission level.” Once I selected a group, I was able to approve or decline the request.

 
Then a colleague and I encountered the “Failed to decline request” error. We both had full control over the site, but neither of us could decline a user’s request for access to the site.


Since selecting a group had fixed my approve problem, I decided to apply the same logic to this decline issue. Low and behold, after selecting a group, my colleague and I were able to decline the request.
 
After experiencing these two issues, I finally recognize the importance of having a default group.
 
To set the default group for a site:

1. Navigate to the site
2. From the Settings wheel, click Site settings
3. Under Users and Permissions, click People and Groups


4. Click the group that will be the default
5. Click Settings and select Make Default Group


6. Click OK to make the current group the default members group


Update: Thanks to my friends at Webucator, you can now watch a video that walks you through identifying and resolving the Failed to Decline Request issue.


Webucator offers customized SharePoint training for private groups as well as public online SharePoint classes and self-paced SharePoint courses for individual students. Check out their website for more details about their SharePoint training.


Sunday, August 10, 2014

Document Sets: A Step-by-Step Guide

My latest work project was to build a document management solution using out-of-the-box features in SharePoint 2013. During my research, I began to feel that many of the available features are underutilized. Of all the features, document sets were my favorite. A document set is often described as a folder on steroids with the attributes of an item. In actuality, a document set is a content type.

While document sets are a somewhat simple concept, there is a certain order that you must follow to build a document set efficiently. Below is the order followed by a detailed explanation of each step.
  1. Create site columns and content types.
  2. Assign site columns.
  3. Publish content types.
  4. Run Content Type Subscriber timer job.
  5. Create document set content types.
  6. Define document set settings and assign additional site columns.
  7. Publish document set content types.
  8. Run Content Type Subscriber timer job.
  9. Assign Document Set Content Type to document library.
  10. Create a document set.
Step 1 – Create Site Columns and Content Types
Before you create the document set, you will need to make sure your desired content types and site columns already exist. Both are created from Site Settings, either at the content type hub or site level. I prefer to create them within my content type hub so that they can be used throughout my SharePoint environment, not just in one site collection.


Step 2 – Assign Site Columns
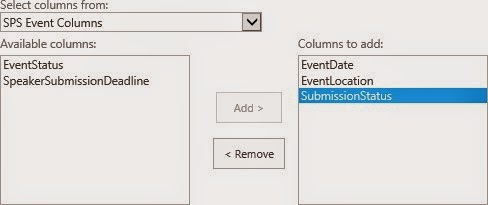
If you create a new content type, click Add from existing site columns to assign site columns to capture specific metadata. You can use existing site columns, also created within your content type hub, or you can create site columns at the site level. Alternatively, you can add site columns to the document set in which the content type will be allowed. The benefit of adding the site columns to the document set or content type is only having to add them once.
 
Step 3 – Publish Content Types
When you have your content type just the way you want it, don’t forget to publish it. Click Manage publishing for this content type, select the radio button for Publish (or Republish if you are updating the content type with changes), and click OK.
 
Step 4 – Run Content Type Subscriber Timer Job
Published (or republished) content types created in the content type hub will become available for use once the Content Type Subscriber timer job runs. If you have SharePoint on-premises and access to Central Administration, you can manually run this timer job. Go to Monitoring > Review Job Definitions and click Content Type Subscriber. You will see its schedule and the last time it ran. Rather than waiting for the next scheduled run, click Run Now to start the timer job.
 
 
Note: If you have SharePoint Online or Office 365, you do not have access to the timer job in Central Administration. Instead, go to Site Settings > Content Type Publishing within your content type hub, mark the checkbox for Refresh all published content types on next update, and click OK.


Step 5 – Create Document Set Content Types
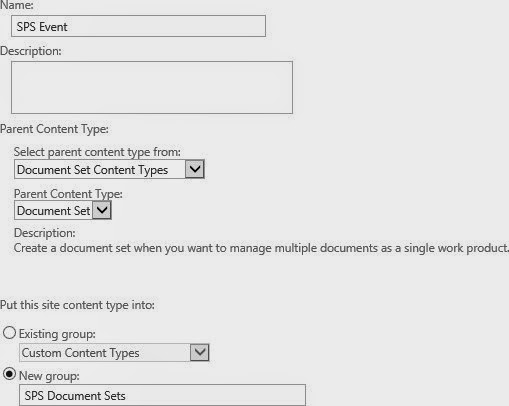
Document sets are created in Site Settings > Site Content Types. If you create the document set within your content type hub, it can be used throughout all of your site collections. The only real decisions when creating the document set are what to name it and where to put it because the Parent Content Type will logically be Document Set.


Step 6 – Define Document Set Settings and Assign Additional Site Columns
Now you can define your document set. Start by clicking Document Set settings. First, choose which content types are allowed in the document set. Filter the available site content types by selecting the group into which you put the new content types. Then highlight the desired content type and click Add. If necessary, you can change the group and add additional content types without saving between groups.
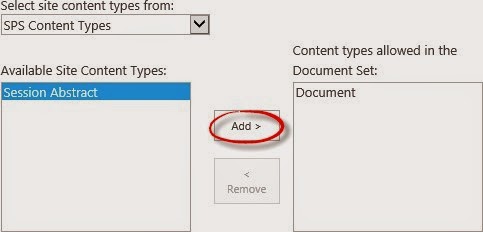
If you do not want the default content type, you must delete it from the Default Content before you can remove it from the content types allowed in the document set.
 
For me, the most attractive attribute of the document set was the ability for items in the document set to inherit the metadata assigned at the document set level. This is achieved through shared columns. In the Document Set settings, mark the checkbox for each column that documents should inherit.


Document sets also have a welcome page that can display its shared columns. Highlight the column to be shared and click Add.

 
If you make changes to the site columns, such as adding more or rearranging the order, you may want to update the welcome page for document sets inheriting from your document set content type. Just mark the checkbox in the Document Set settings.
 

Another way to customize the document set is to add additional site columns. Click Add from existing site columns and follow the same process as outlined above in Step 2.
 
Step 7 – Publish Document Set Content Types
When your document set is ready, make sure you publish it. This is the same process that you did in Step 3 to publish the newly created content types.
 
Step 8 – Run Content Type Subscriber Timer Job
Just like step 4, you must run the Content Type Subscriber timer job from Central Administration, assuming you created your document sets within the content type hub. Alternatively, you can wait for the timer job to run on its normal schedule.
 
Note: For SharePoint Online or Office 365, you can return to Content Type Publishing, as mentioned in step 4.
 
Step 9 - Assign Document Set Content Type to Document Library
Now that your document set is available for use, you must assign it to the document library. First, go to Library Settings and click Advanced Settings. Select the Yes radio button for Allow management of content types. Click OK to save the changes.


Upon returning to the Document Library settings, scroll down to the Content Types section. First, click Add from existing site content types. Highlight the desired document set and click Add. Repeat until all of the desired document sets are listed under Content types to add and click OK.


Next, click Change new button order and default content type. If there are any content types that you do not want displayed on the new document menu, unmark the checkbox for those content types under Visible. Arrange the content types in the order in which they should appear on the new document menu by assigning the appropriate numerical value under Position from Top. The content type in the first position will become the default content type.


Step 10 - Create a Document Set
Navigate to the document library where the document set content type was enabled. From the ribbon, click Files and select the document set from the New Document menu.


Disadvantages of Document Sets
What don’t I like about document sets? First and foremost, you cannot create a view within a document set, thus preventing you from sorting, filtering, or grouping. Also, unless you disable the option to Make “New Folder” command available in the library’s Advanced Settings, you can create folders and subfolders within the document set. While I do not fully support the use of folders, another disadvantage of document sets (and document libraries) is that you cannot drag folders into the document set. (The workaround is to open the document library or document set using the Open with Explorer feature.)
 
More Advantages of Document Sets
Let’s end on a positive note. First, you can drag and drop up to 100 files into a document set. (If you don’t see drag files here, check your version of Internet Explorer and/or my blog post on Using Office 2010 with SharePoint 2013.) Because document sets are part of a document library, you can create views within the library. Those views do allow you to sort, filter, and group; and you can create a view that shows all the documents without folders. However, the document set will display as an item. You can also export the view to Excel, where you can do additional sorting and filtering.

Wrap Up
Document sets are a great way to promote metadata and replace folders without taking away any security features. By referring to document sets as special folders, users can maintain the comfort they have developed with folders while getting away from infinite levels of subfolders.
 
Additional Resources


Tuesday, March 18, 2014

My SharePoint TV Debut

Lights, camera, action!

Almost a year after moving to Houston and becoming involved with the Houston SharePoint User Group (HSPUG), I am still an active member and volunteer. I have switched to the speakers committee because I enjoy helping HSPUG find awesome speakers to enlighten us. At SharePoint Conference 2014, I had the opportunity to be one of four members representing HSPUG on SharePoint Conference TV (SPCtv). My TV co-stars include Troy Lanphier, Naomi Moneypenny, and Mark Freeman.

If you would like to learn more about HSPUG, go ahead and watch HSPUG on SPCtv. I'm not promising a cliff hanger ending like "Who shot JR?", but you will get a better understanding of why I like this group so much.


Wednesday, March 12, 2014

SharePoint World Domination

SharePoint has descended upon Las Vegas. 10,000 developers, administrators, power users, executives, and sponsors from 85 countries have gathered for SharePoint Conference 2014, a.k.a. #spc14. That hashtag represents not only the conference's presence on Twitter but also on Yammer. More on that later...

The morning kicked off with breakfast. Just like at #k2con, there were scrambled eggs but no salsa. Where's the salsa? There are at least a dozen of us from Texas here. I don't know if all the Texans need salsa for scrambled eggs, but I sure do! The redeeming factor was that there was...as you may have guessed...bacon. Even though I'm not a huge fan of bacon, I did have one piece so that I may remain in this cult known as SharePoint.

On three separate occasions, I had the opportunity to meet folks from Denmark. One of the gentlemen told me that there are about 200 people from Denmark at SPC14. I asked one of them why they came to this conference rather than going to the European SharePoint Conference. He said that the European conference is not as big. And let's face it, it's also not in Las Vegas...Sin City...where everything that happens gets posted to social media for the world to enjoy.

The day was filled with keynote and breakout sessions. The worth-a-mention of the morning keynote was hearing President Clinton talk about technology. I had not thought about it before, but he was the president when the Internet became popular. He never mentioned SharePoint, but he talked kindly about Microsoft and the Bill Gates Foundation.

So what was the highlight of the keynote session? Jeff Teper from Microsoft revealed a new app, code named Oslo, that will bring relevant content to the user instead of the user having to search for it. Views include presented to me, shared with me, trending around me, modified by me, liked by me, and viewed by me. I have deemed "work like a network" as Microsoft's new catch phrase. It was also announced that the next versions of SharePoint, Exchange, and Office would be released in 2015. SharePoint on-premises lives on!

At the IT Pro keynote, Bill Baer talked about  the transformation of IT, SharePoint 2013 and Service Pack 1, and Office Innovation. As we all know and have experienced, IT is being asked to do more. Microsoft wants to transition systems administrators to value added service brokers. In other words. IT professionals would be proactive, rather than reactive. As for SP2013 and SP1, Bill focused on the new features that SP1 brings, such as Yammer integration, OneDrive for business, and Windows Server 2012 R2 support. He also mentioned that in Office 365, Yammer can replace newsfeeds through a setting in Central Admin. My favorite quote from Bill came from during one of the demos, when he was in Central Administration. "SharePoint Health Analyzer has detected an issue. When doesn't it?" (Maybe the SharePoint Health Analyzer needs some bacon!) On the topic of Office Innovation, Bill talked about a new feature code named Fort Knox, which introduces two-factor authentication. Also, Office 365 will be capable of handling 1 petabyte (PB) tenants and 1TB site collections.

After lunch, I went to a session to learn how anyone can build an Access app. Since I already have 3 blog posts about Access Apps in SharePoint 2013, I was already familiar with most of the content for this session.

My last session of the day was Microsoft's Roadmap for Enterprise Social. The speakers focused on "work like a network," did a more in-depth demonstration of Oslo, and explained the Office Graph. Another feature they highlighted was the ability to have Yammer conversations inside Office documents. Christophe Fiessinger finally and officially answered the question "SharePoint Social or Yammer?" The answer was "Go Yammer!" Although SharePoint social features will exist in SharePoint 2015, those features will not be enhanced or improved from what they are now. The focus and investments are on Yammer.

That was day one of SPC14. Between sessions, networking events (a.k.a. parties), and a little sleep, I did not blog about each day individually. Stay tuned for a post-SPC blog where I'll share the highlights from the rest of the conference.

Don't forget... When you get into SharePoint, you get into bacon!


Monday, March 3, 2014

When You Get Into SharePoint, You Get Into Bacon

#k2con is gone...but not forgotten!

Hopefully you've read my previous post #k2 con is on! If not, you'll want to do that before you read this one.

OK, now that you're all caught up, let's recap day 2 of the first K2 User Conference.

Day 2 started with a disappointment. There was no bacon at breakfast. The rest of the choices were about the same as day 1, but we had sausage patties instead of bacon. After tweeting my disappointment, I was informed, through Twitter, that there was bacon on the muffins in the hall. While I never investigated for myself, I was happy to have my faith in bacon at SharePoint related events renewed.

At the beginning of the keynote, emcee/comedian Baratunde Thurston had some quotes from various people from day 1. He said he was up early, checking out social media to see what we attendees were saying about the conference. While he expected there to be tweets, he did not expect to find a lengthy blog post recapping day 1 written early on the morning of day 2. Yes, it was my blog post #k2con is on!

Just for fun, Baratunde brought me up on stage, where I got to do some shameless self-promotion. Then, Baratunde performed a dramatic reading of my entire blog post. He would read a little and then stop and ask me a question. My answers generally seemed to surprise him and make him laugh. I'd like to thank the audience for laughing along (LOL). I may have also interjected once or twice, which almost made Baratunde regret his decision. All in all, it was a fun start to the morning. Because of my new fame (notoriety?), I had the opportunity to meet many people who otherwise would have remained strangers.

The best quote, which actually came from me...an original thought!... was "When you get into SharePoint, you get into bacon." Thank you to those who tweeted what is now my personal slogan. I've added it to my Twitter profile, too.

As a SharePoint enthusiast for more than 5 years, I have always thought of K2 as a third party add-on for SharePoint. During the conference, though, I saw many examples of how K2 is used as a standalone platform or in conjunction with non-SharePoint platforms and systems.

At the next K2 User Conference, I'd like to see more entry-level sessions. The ones I attended assumed that you were a current K2 customer and that you had built workflows, forms, and/or solutions already. I feel that this alienated new customers or employees who were new to their companies using K2.

If you're still in Vegas and attending the SharePoint Conference, remember this one thing:

What happens in Vegas stays ...on social media to live on forever and ever!

Sunday, March 2, 2014

#K2Con Is On!

Greetings from Las Vegas!

Since I'm awake way too early (but an hour later than yesterday), I thought I'd update you on how the first K2 User Conference is going.

The morning kicked off with registration and breakfast at 7am. The K2 staff was ready and checking people in even before 7am. I appreciate that they were able to accommodate us early birds. While I waited for breakfast to open, I browsed the vendor/sponsor halls. Typically, I see the same companies at SharePoint events, but there were some new ones this time. Later in the day, I had the opportunity to speak with 5th Method. I asked them what the first 4methods were. I'm not sure they appreciated my humor, but they were good sports about it. Back to breakfast...it was your typical conference breakfast with some carbs, some fruit, and of course BACON! I'm not a huge fan of bacon, but you can't have a SharePoint related conference without bacon. While I ate, I met some nice people from Massachusetts. It turns out that they are clients of my friends from Atrion. It's a small world after all...

The keynote included some technical folks from K2, Microsoft, and Clarity Consulting. Marketform was the winner of the FWD Thinker award and demonstrated their K2 solution called Alfred for us. Since a few of my co-workers recently completed a SharePoint front-end solution similar to Alfred, I was intrigued and impressed by Alfred. The emcee for the morning was Baratunde Thurston, author of How To Be Black. He's also a comedian and entrepreneur. His presentation was entertaining, insightful, and down right funny. I liked how he told a bunch of stories that were so well linked together it felt like a personal conversation.

After lunch, the breakout sessions began. First, K2 demonstrated their new product K2 for SharePoint. They implemented K2 for SharePoint in under 5 minutes. I have not implemented, configured, or used K2 yet myself, but I've heard that it can be quite difficult. Needless to say, the live demo was a huge success. K2 for SharePoint is expected to be available to blackpearl customers in April.

Then there were three more sessions: Fast Data, Using K2 to build K2 for SharePoint, and Fast Forms. As a non-developer and not-yet-a-K2-user, I found the first 2 sessions to be more technical and more advanced than I would have liked. In the Fast Forms session, the speaker introduced us to K2D2, a robot who can be controlled through K2 and who can post to Yammer when his head is removed. That was really cool and fun!

In the evening, I attended the K2 attendee party at the Vanity nightclub in the Hard Hotel & Casino. The booths in the club had a 70s feel to them, which I really enjoyed. Our booth was right by the dance floor. When "Thriller" by Michael Jackson played, about a dozen zombies came out and danced in, with, and among the crowd. They even stuck around for most of the night. After the zombie attack, I had a photo op with Adriaan Van Wyck, the CEO of K2. He was a very down to earth guy, and I enjoyed the chance to meet him.


When the party finally ended an hour later than scheduled, I returned to my room for some much needed sleep. I've got another full day of K2 sessions, followed by the SharePoint Conference welcome reception tonight. If you're at either conference, I'd love to meet you! If you're not here, follow #k2con and #spc14 to be virtually here.

I'll leave you with this quote from Marketform's presentation yesterday. Since tweeting it, this quote has received 7 retweets and 2 favorites, so it must be important. :)

"The difference between good solutions and great solutions is the user experience."

Wednesday, February 26, 2014

Viva La SPC14!

In a few days, I'll be heading to Las Vegas for two conferences. First, I'll be attending the K2 User Conference at the Hard Rock Hotel on March 1 and 2. Then, I'll head over to the Venetian for the SharePoint Conference 2014. Both conferences will provide more knowledge than my brain can handle, but here's a brief look at what I'm looking forward to the most.
 
The K2 user conference is sold out. Thus, I expect to meet a lot of K2 users. Since I have not personally used K2 yet, I hope to learn how they are using K2, as well as picking up some general tips and best practices. I'm most excited about the Fast Forms session on Saturday, where I'll see how to build forms using K2. On Sunday, I'm looking forward to the Fast Workflow session, where I'll see, for the second time ever, how to build a K2 workflow. I don't expect to be a K2 expert at the end of the K2 user conference, but I do hope that I'll have a broader knowledge of K2 products.

The SharePoint Conference kicks off Sunday evening with a welcome reception. I anticipate that I'll see quite a few people I met at various SharePoint Saturday events last year. Many of them are SPC14 speakers, and I wish them well!

Monday begins with the keynote speeches, most notably (or infamously?) the Bill Clinton keynote. If Al Gore invented the Internet, then Bill Clinton invented SharePoint, right? I'll be sure to NOT wear a blue dress.

Once the breakout sessions start Monday afternoon, I'm going to be torn between the business (end) user track and the IT Pro track. To temporarily satisfy my dual personalities (I'm a Gemini), I have added two tracks to most time slots. When it's time to go to a session, I'll decide which one strikes my fancy at that particular moment. If I change my mind 10 minutes into the session, I'll know what my alternate choice was. Let's just hope they're located in close proximity. (If they're not, then I'll be breaking in my new shoes and gaining additional Fitbit steps.)

Are you going to the session on the retirement of InfoPath? I predict that this will be the most attended session of the entire conference (excluding keynotes). I'm thinking about going to a different session for a couple of reasons. First, everyone will be talking about what was announced during the session. Therefore, I can get all of the information second hand. Additionally, the session materials (and probably a recording of the session) will be available online after the conference. So I will have yet another opportunity to find out what the replacement for InfoPath is...first hand this time!

One way I plan to meet new people is to attend the two Women in SharePoint events. First, there will be an informal gathering at Sunday night's welcome reception. Then, on Wednesday, is the official Women in SharePoint lunch. (On MySPC, it's called Women in Technology Lunch.) The all-star panel includes Cathy Dew, Lori Gowin, Naomi Moneypenny, Laura Rogers, and Jennifer Mason. These ladies are sure to have some great stories and encouraging advice. If you're a woman in SharePoint, you should join us! Just put the session on your schedule. There's no extra fee to attend.

Another networking opportunity that isn't on the official schedule is the Netcast Hooligans breakfast on Wednesday. This is your chance to meet and dine with Todd Klindt, author, Netcast host, and SharePoint administrator extraordinaire. (Don't let his session on load testing with Visual Studio fool you into thinking he's a developer!)

If you're staying in Vegas Thursday night, be sure to register for and attend #ShareHofbrau. This is an annual, unofficial post-SPC dinner held at Hofbrau and organized by Corey Roth. I'll unfortunately miss this fantastic event because I'll be on a plane headed back to Houston.

For more ideas on what to expect at the SharePoint Conference, check out these blogs.
If you have a Twitter account, I suggest you save a search for #spc14 and follow @spconf, @spcpartypatrol, and @SharePointMadam. Yes, that last one is me. I'll be tweeting my SharePoint Conference experience throughout the days...and nights.

Those are my thoughts on SharePoint Conference 2014. Now it's time to pack. Wish me luck!

Friday, January 3, 2014

Integrating Yammer with SharePoint 2013

SharePoint 2013 has a Yammer app that can be installed to integrate the two products. If you are using a non-Microsoft supported app, such as Chrome or Firefox, typically you just need to sign into the Yammer app to make it work. However, if you are using Internet Explorer, especially IE11, you may need to make a few modifications to the Trusted Sites. Just follow these steps.


1.    In Internet Explorer, open Internet Options.

2.    Click on the Security tab.

3.    Click on Trusted Sites and then click Sites.

4.    Add the following four URLs:

·        https://*.assets-yammer.com

·         https://*.sharepoint.com

·         https://*.yammer.com


5.    After adding the last URL, click Close.

6.    Click Close.


You should now be able to log into the Yammer app for SharePoint 2013.

Thursday, January 2, 2014

Using Office 2010 with SharePoint 2013

If you are using Office 2010 with SharePoint 2013, you may have noticed two issues. First, “drag files here” is missing from your document libraries. Second, you may not be able to open Microsoft Office files from inside SharePoint because “some content or files on this webpage require a program that you don’t have installed.” Let’s examine and resolve each of these issues.


The ability to drag and drop files into a SharePoint 2013 document library is a new feature that requires some Office 2013 files to be installed on your computer. To obtain these files, you can install any Office 2013 program. If your organization is not ready to roll out Office 2013 enterprise wide, you can install Lync 2013 or SharePoint Designer 2013. Because SharePoint Designer is a powerful tool, only power users with appropriate training should use it to modify SharePoint sites. Through Central Administration, farm administrators who are worried about the unauthorized use of SharePoint Designer can control—at the web application level—which users are allowed to use the tool.
 
After installing an Office 2013 program to enable the drag and drop to a document library feature, users may not be able to open Office files—such as Word, Excel, or PowerPoint—in the client or desktop application. This is a known issue that is resolved by installing Service Pack 2 for Office 2010. Click here for the 32-bit version or click here for the 64-bit version of the Office 2010 Service Pack 2.