My latest
work project was to build a document management solution using out-of-the-box
features in SharePoint 2013. During my research, I began to feel that many of
the available features are underutilized. Of all the features, document sets
were my favorite. A document set is often described as a folder on steroids
with the attributes of an item. In actuality, a document set is a content type.
While
document sets are a somewhat simple concept, there is a certain order that you
must follow to build a document set efficiently. Below is the order followed by
a detailed explanation of each step.
-
Create site
columns and content types.
- Assign site columns.
- Publish
content types.
- Run Content
Type Subscriber timer job.
- Create document
set content types.
- Define
document set settings and assign additional site columns.
- Publish
document set content types.
- Run Content
Type Subscriber timer job.
- Assign
Document Set Content Type to document library.
- Create a
document set.
Step 1 – Create Site Columns and Content Types
Before you create
the document set, you will need to make sure your desired content types and
site columns already exist. Both are created from Site Settings, either at the content type hub or site level. I
prefer to create them within my content type hub so that they can be used
throughout my SharePoint environment, not just in one site collection.

Step 2 – Assign Site Columns
If you create
a new content type, click Add from
existing site columns to assign site columns to capture specific metadata.
You can use existing site columns, also created within your content type hub,
or you can create site columns at the site level. Alternatively, you can add
site columns to the document set in which the content type will be allowed. The
benefit of adding the site columns to the document set or content type is only having to add
them once.
Step 3 – Publish Content Types
When you have
your content type just the way you want it, don’t forget to publish it. Click Manage publishing for this content type,
select the radio button for Publish
(or Republish if you are updating the
content type with changes), and click OK.
Step 4 – Run Content Type Subscriber Timer Job
Published (or
republished) content types created in the content type hub will become
available for use once the Content Type Subscriber timer job runs. If you have
SharePoint on-premises and access to Central Administration, you can manually
run this timer job. Go to Monitoring
> Review Job Definitions and click Content Type Subscriber. You will see
its schedule and the last time it ran. Rather than waiting for the next
scheduled run, click Run Now to start
the timer job.
Note: If you have SharePoint Online or Office 365, you do not have access to the timer job in Central Administration. Instead, go to Site Settings > Content Type Publishing within your content type hub, mark the checkbox for Refresh all published content types on next update, and click OK.
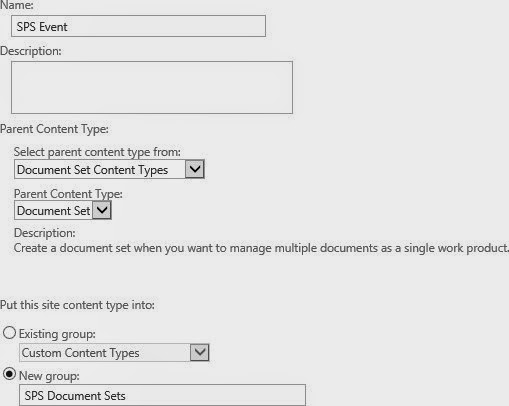
Step 5 – Create Document Set Content Types
Document sets
are created in Site Settings > Site
Content Types. If you create the document set within your content type hub,
it can be used throughout all of your site collections. The only real decisions
when creating the document set are what to name it and where to put it because
the Parent Content Type will logically be Document Set.
Step
6 – Define Document Set Settings and Assign Additional Site Columns
Now you can define your
document set. Start by clicking Document
Set settings. First, choose which content types are
allowed in the document set. Filter the available site content types by
selecting the group into which you put the new content types. Then highlight
the desired content type and click Add.
If necessary, you can change the group and add additional content types without
saving between groups.
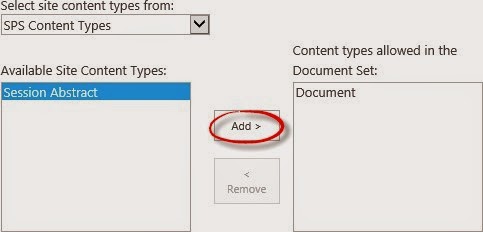
If you do not want the default content
type, you must delete it from the Default Content before you can remove it from
the content types allowed in the document set.
For me, the most attractive attribute
of the document set was the ability for items in the document set to inherit
the metadata assigned at the document set level. This is achieved through
shared columns. In the Document Set settings, mark the checkbox for each column
that documents should inherit.
Document sets also have a welcome
page that can display its shared columns. Highlight the column to be shared and
click Add.
If you make changes to the site
columns, such as adding more or rearranging the order, you may want to update
the welcome page for document sets inheriting from your document set content
type. Just mark the checkbox in the Document Set settings.
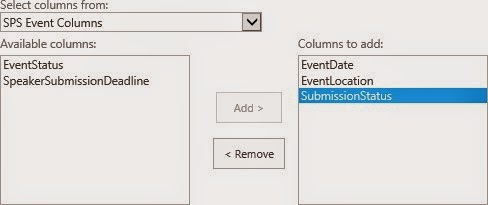
Another way
to customize the document set is to add additional site columns. Click Add
from existing site columns and follow the same process as outlined above in
Step 2.
Step 7 – Publish Document Set Content Types
When your
document set is ready, make sure you publish it. This is the same process that you
did in Step 3 to publish the newly created content types.
Step 8 – Run Content Type Subscriber Timer Job
Just like
step 4, you must run the Content Type Subscriber timer job from Central
Administration, assuming you created your document sets within the content type
hub. Alternatively, you can wait for the timer job to run on its normal
schedule.
Note: For SharePoint Online or Office 365, you can return to Content Type Publishing, as mentioned in step 4.
Step 9 - Assign Document Set Content Type to Document
Library
Now that your
document set is available for use, you must assign it to the document library.
First, go to Library Settings and
click Advanced Settings. Select the Yes radio button for Allow management of content types. Click
OK to save the changes.
Upon
returning to the Document Library settings, scroll down to the Content Types
section. First, click Add from existing
site content types. Highlight the desired document set and click Add.
Repeat until all of the desired document sets are listed under Content types to
add and click OK.
Next, click Change new button order and default content
type. If there are any content types that you do not want displayed on the
new document menu, unmark the checkbox for those content types under Visible. Arrange the content types in
the order in which they should appear on the new document menu by assigning the
appropriate numerical value under Position
from Top. The content type in the first position will become the default
content type.
Step 10 - Create a Document Set
Navigate to
the document library where the document set content type was enabled. From the
ribbon, click Files and select the document set from the New Document menu.
Disadvantages of Document Sets
What don’t I like about document
sets? First and foremost, you cannot create a view within a document set, thus
preventing you from sorting, filtering, or grouping. Also, unless you disable
the option to Make “New Folder” command
available in the library’s Advanced Settings, you can create folders and
subfolders within the document set. While I do not fully support the use of
folders, another disadvantage of document sets (and document libraries) is that
you cannot drag folders into the document set. (The workaround is to open the
document library or document set using the Open with Explorer feature.)
More Advantages of Document Sets
Let’s end on a positive note. First,
you can drag and drop up to 100 files into a document set. (If you don’t see
drag files here, check your version of Internet Explorer and/or my blog post on
Using
Office 2010 with SharePoint 2013.) Because
document sets are part of a document library, you can create views within the
library. Those views do allow you to sort, filter, and group; and you can
create a view that shows all the documents without folders. However, the
document set will display as an item. You can also export the view to Excel,
where you can do additional sorting and filtering.
Wrap Up
Document sets are a great way to promote metadata and replace folders without taking away any security features. By referring to document sets as special folders, users can maintain the comfort they have developed with folders while getting away from infinite levels of subfolders.
Additional Resources