The Drop Off
Library was introduced in SharePoint 2010 and is still available in SharePoint
2013. Its purpose is to automatically route documents from a “dumping ground”
(in the form of a document library) to the appropriate location (another
document library) based on content types. The Drop Off Library and the
destination library do not have to be in the same site or even in the same site
collection.
As an
example, an organization can put a Drop Off Library on each department’s site.
After employees upload their expense reports and select the expense report
content type, SharePoint will then move the expense report to the appropriate
document library on the accounting department’s site. The employees never have
to leave their own department’s site.
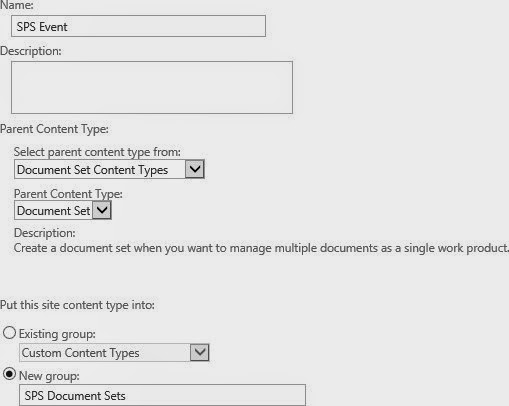
Before you
begin, make sure you have created the necessary content types and assigned
those content types to the destination drop off libraries. If you’re going to
use the same content type across multiple sites within the same site
collection, set up the content type at the top level of the site collection so
that you only have to create it once. Similarly, if you’re going to use the
same content type across multiple site collections, set it up in your content
type hub (if you have one). For more information on creating content types, see
my previous blog post Document Sets: A
Step-by-Step Guide.
To begin, you
must first activate the Content Organizer site feature on all the sites where
you want to have drop off libraries (the dumping ground) and destination
libraries.
1.
Site Settings > Manage Site Features > Content Organizer >
Activate
Next, you
will set up the Content Organizer Settings on all the sites where you will have
a Drop Off Library.
2. Site
Settings > Content Organizer Settings
Review the
default options and change any that don’t fit your business needs. For example,
if you want to allow documents to move to a library in another site (or site
collection), you’ll need to mark the checkbox for Allow rules to specify another site as a target location.
Depending on
your philosophy about folders in SharePoint, you may want to mark the checkbox
to Create subfolders after a target
location has too many items. Personally, I try not to use folders in
SharePoint, but one level of folders is my acceptable limit.
In case an
employee uploads the same file multiple times, by default SharePoint will apply
versioning. If you’d rather have separate files (think about your storage
capacity), you can mark the checkbox for Append
unique characters to the end of duplicate filenames. FYI, these are random
characters and cannot be customized.
To ensure
that documents uploaded to a Drop Off Library are routed in a timely manner,
rule managers will receive an email when submissions do not match a rule or
when content has been left in the Drop Off Library. The default is three days,
but you can change that number to better suite your business needs. You can
also specify who the rule managers are (individuals or groups).
After the
Content Organizer Settings are to your liking, you will need to set up the
Content Organizer Rules.
3. Site
Settings > Content Organizer Rules
4. Click + new item to
create a new rule.
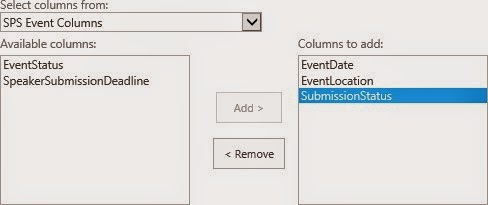
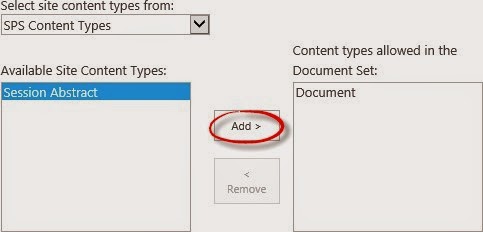
Hopefully,
when you created your content types, you put them into a unique group so that
you can filter by that group here. If you didn’t name the content types the
same on this site (or site collection) as the site (or site collection) where
the destination library is, you’ll need to mark the checkbox for This content type has alternate names in
other sites.
By default,
there is one property-based condition started for you. You can complete it if
you want to use conditions, or you can delete it if you don’t.
In the
Destination box, enter the URL for the destination library. Alternatively, you
can click the Browse button to locate the destination library.
If
the content type has not been assigned to the destination library, you will see
the error message The selected library
does not have this content type.
When all the settings are appropriately configured,
click OK. You will be returned to the Content Organizer Rules screen, where you
can view existing rules or create a new one.
Now you’re
ready to test your Drop Off Library.
5. Navigate to the Drop Off Library. (There will be a link to it on the
Quick Launch.)
6. Upload a document.
You’ll notice
that the document is checked out to you. Before you check it in, you need to
select a content type for the document.
7. Mark
the checkbox next to the item, click the Files tab above the ribbon, and click
Edit Properties.
When the Edit
Properties screen opens, you’ll notice a message in a yellow bar at the top.
8. From the Content Type dropdown, select the appropriate
content type.
9. Click Submit.
The message
Saved to final location will appear with a link to where the document was
moved.
10. Either
click the link to go the location, or click OK to return to the Drop Off
Library.