Monday, December 2, 2013

MDS Caused Error After Modifying List View

Should I deactivate Minimal Download Strategy (MDS) on a Team site that has Publishing features enabled? The answer is yes.
 
On October 15, I posted this question on SPYAM. Although I only received 3 responses, no one objected to the idea. I thus went into my client's SharePoint 2013 environment and deactivated MDS on all of the sites...or so I thought.
 
Minimal Download Strategy is a new feature in SharePoint 2013 that reloads only the parts of the page that have changed. MDS works well with Team sites and is automatically activated when you create a Team site. Unfortunately, it can cause the page to load twice on Publishing sites.

The reason we had Publishing features activated on Team sites was to make use of an app that we had downloaded from the SharePoint store. It worked fine on Team sites but gave us a 503 error on Publishing sites. Because we had a custom master page with custom CSS, we had built the main web app using the Publishing site template. To quickly get around the 503 error, we rebuilt the web app with the Team site template and manually activated the Publishing features.

A few weeks later, we noticed that some sites were throwing an error after changing the view in a list. The error always started with a number, but that number varied. The rest of the error was always the same, as seen in the example below.
 
86|pageRedirect|owssvr|http://webapp.clientname.com/dept/finance/acctg/Lists/icontacts/AllItems.aspx 

After much research and testing, my co-worker and I discovered the problem. The list view error was only occurring on the sites where MDS was (unintentionally) still enabled. By deactivating MDS on those sites, we eliminated the list view error. My co-worker's full explanation is below.

"The OWSSVR.dll is a Remote Procedure Call (RPC) component of SharePoint. It’s part of a web service, that among several other things, accesses list and library functions through CAML queries. In this case the Minimal Download Strategy (MDS) Feature uses this web service like an AJAX call to only refresh page level elements rather than the whole page itself. This is a way Microsoft tries to increase perceived page load performance.

"I found if we disable this feature the OWSSRV.dll 6500 error no longer occurs when saving List Views and I have not found any additional impact on disabling this feature."
 

Monday, November 18, 2013

Local Columns Not Associated with Custom Content Types

Recently, I was working with a client who just went live on SharePoint 2013. On a subsite of the home page, there is a document library containing forms and policies. To visually organize the library, I added a choice column called DocType. As you guessed, the choice types were Form and Policy. When I edited the properties of one of the documents, I noticed that the new column was not visible.

Further investigation revealed that the local column was associated with the original content type, Document, but not associated with the default (custom) content type, Client Document. The client is on the March 2013 Public Update. So I tested this functionality in a SharePoint 2013 RTM environment, and the local column did associate with the default (custom) content type as well as the original content type.

I had two friends test using the same steps. The friend who is also on SharePoint 2013 RTM had success in the local column associating with the default (custom) content type as well as the original content type. However, the friend who is on the August 2013 Cumulative Update did not have success. In her environment, the local column associated only with the original content type and not the default (custom) content type.
 
If you have a SharePoint 2013 environment that is on the October 2013 CU, I encourage you to test this functionality using the steps below and report your results in the comments section. The more attention we give this scenario, the more hope there is that it will be resolved in an upcoming hotfix or cumulative update.
 
Steps to Test in Your SharePoint 2013 Environment
1. In a document library, add a custom content type and make it the default content type. The original content type should still be associated with the library but not visible.
2. In the same document library, add a choice column to be used as local metadata. When creating the column, ensure that the checkbox for "Add to all content types" is marked.


3. In the Columns section of the Document Library Settings, notice that the local column is associated with the original content type but not the default (custom) content type.

4. Upload a document to the library.

5. Edit the properties of the document. Notice that the newly added column does not display.


Thursday, May 30, 2013

Access Apps for SharePoint 2013 - Part 3

If you couldn’t find an Access app template to suit your needs, then the SharePoint store may have a solution for you. (To find out if you have permission to install an app from the SharePoint store, check with your SharePoint administrator.) My favorite (and an easy) way to find the store is to go to http://office.microsoft.com/store. From the dropdown menu under Apps for Office and SharePoint, click on Apps for SharePoint.


You can use the navigation on the left to filter the displayed apps, or you can use the search box in the top right corner. For example, I searched on “Access” to see all of the Access apps currently available.


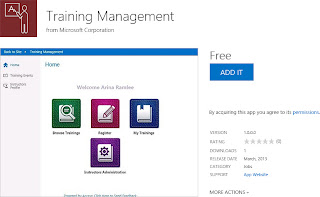
Since I was a corporate trainer for 11 years, I’m especially interested in the Training Management app. If you hover over an app, you’ll see its description. To purchase the app (even if it’s free), start by clicking on the app.


Once you click on the button to Add It, you’ll be prompted to confirm that you wish to add the app. Simply press the Continue button.


Now that you have acquired an app from the SharePoint store, you need to install the app on one or more of your SharePoint sites. First, navigate to the site where you want to add the app. From the getting started section of your site, click Add lists, libraries, and other apps.


In the section titled Apps you can add, you’ll see the app you just acquired. (You can also sort the apps by Name or page through the apps until you find the one you want to add.) To begin the app installation process, click on the app. You will be asked if you trust the app. Click Trust It to continue.


SharePoint then takes you to the Site Contents page, where you can see all of your lists, libraries, and apps. Locate your new app and click on it to open it. Just like with our custom web apps built from scratch and from a template, the Access app has a list view form and a datasheet view form for each table. You can add, edit, and delete data within the tables. However, depending on the app’s author, you may or may not be able to edit the tables in Access. For the Training Management Access app, there is no option to edit the tables. From a support perspective, that makes sense.

This post concludes my blog series on Access apps in SharePoint 2013. But wait – there’s more! Even though I promised you three parts, we haven’t looked at creating a table from an existing data source, such as an Excel file or a SharePoint list. Because this is a valuable option, I’ll do a bonus round to this blog series. Stay tuned!

Wednesday, May 29, 2013

Access Apps in SharePoint 2013 - Part 2

I initially became interested in Access apps (and Access Services) because I heard it was the replacement for electronic forms (formerly created in InfoPath) for SharePoint. Through my own research, I have found that InfoPath does still work with SharePoint 2013. So then what is the purpose of having an Access database in SharePoint when everything that’s in SharePoint is written to a SQL server anyway? It recently occurred to me that non-IT personnel likely do not have access to their organization’s SQL databases. (Let’s hope not!) So Access apps in SharePoint 2013 provide business/end/power users with more functionality than a SharePoint list but are less dangerous than read/write access to SQL.

This is part 2 of my blog series on Access Apps in SharePoint 2013. If you haven’t read part 1 yet, click here to view it. You’ll learn about the requirements for Access Services and how to create a custom web app from a blank database. Ready to proceed? Let’s build!
We are now going to explore how to create an Access app using a template. After you open your Access 2013 client, choose Custom Web App, and sign in to Office 365 (if necessary), you will see a search box that allows you to find existing Access app templates. Since I am moving soon, I decided to track all of the furniture and boxes that are making the journey. So I called my database Home Inventory and searched for an inventory template. Out of the four choices, I selected Home Inventory.


Access automatically creates a table. If the table doesn’t contain all of the fields that you want to track, double-click on the table name on the left side of the screen. The table will open in design view so that you can add new or change existing fields. For example, I added a lookup field for Item Type (box, furniture, other, etc.). To maintain consistency, I also changed the Location field from short text to lookup (dining room, kitchen, living room, etc.). After you save your changes, you may want to edit the List or Datasheet form view. To do so, click on the tab bearing the database name and then click on the table whose form view you wish to edit. By default, Access displays the List form view. Click the Edit button to make changes.

 
Now you can add or rearrange fields by dragging and dropping. To delete a field, click on it and press delete on your keyboard. (Deleting the field from the form does not delete it from the table.) Don’t forget to also delete the label for that deleted field. Best of all, you can undo your changes using the familiar undo button or CTRL Z. Additionally, if you need to edit the database, there is a convenient link on the right side of the screen.
 

Once you’re happy with your changes, or if you want to preview your work, save your changes and then launch the app. If your table doesn’t yet contain data, you can enter it in SharePoint. This is a good way to test the flow of the fields to ensure that they make sense. You should also test the filter that is automatically included.


Access templates are a great way to get started with Access apps for SharePoint 2013. Get started today!

Tuesday, May 28, 2013

Access Apps in SharePoint 2013 - Part 1

What is Access Services? What are Access apps and why would I use them?

Those are two questions I have been contemplating for a while now. Last month, I spent a day trying to figure out the answers but didn't make much progress. Then last week, I made another attempt and had some success. As promised, I'm going to share with you what I have learned so that you don't have to start from scratch.

In a workshop I attended in April, I learned that the Access Service Application is one of the many service applications that received enhancements for 2013. A TechNet article on Access Services - SharePoint 2013 states, “Access Services in SharePoint Server 2013 allows people to host Access databases in SharePoint within the context of an Access app” (Lussier, 2013). Thus, Access Services is the tool that allows Access to run in SharePoint, and an Access app is how you can view your Access database in SharePoint.

Before we get into the how-to, let's discuss some requirements. If you're not the technical person or farm administrator, you might want to take a second to send that person a link to this blog post. I'll wait. Ready? Ok, let's continue. There are three requirements I want to make clear. First, your SharePoint server must be configured as a SharePoint app server. Second, the Access service application requires a SQL Server 2012 application database server. The rest of your SharePoint environment can use SQL Server 2008R2. Finally, because Access apps are built using the Access desktop client, you must have Access 2013 running on your Windows 7 or Windows 8 machine. (For the full list of requirements, see the Access Services - SharePoint 2013 article on TechNet.)

How do you build an Access app? There are three possible methods: build a custom web app, use a web app template, or download a web app from the Office store. In Part 1 of this blog series, we will build a custom web app from scratch. In parts 2 and 3, we'll explore the other methods.


To build a custom web app, the first thing you do is open the Access 2013 client on your computer. After you select Custom Web App, you'll be prompted to name the database and enter a location for your SharePoint site.


If you're using Office 365 (as I am), you'll be prompted to sign in. Once Access opens, you'll see two options. At the top of the screen, you can search for a template. At the bottom of the screen, you can choose an existing data source, such as an Excel file or a SharePoint list. To create a new table, within the text to the right of the table search, click the link for add a new blank table.


Access will create a new table for which you can then create fields, define data types, and provide descriptions. After you save the table, switch to datasheet view to enter data. Create as many tables as necessary.

Finally, you are ready to view to your Access app in SharePoint. To do so, click Launch App from the Home ribbon. For each table, there will be a List form view and a Datasheet form view. The List form view is displayed by default. You can click Datasheet to switch to that view. Both form views can be edited in the Access client.


 To view a different table, click on the table name on the left side of the screen.

 
Now that you know how to build a custom web app in Access 2013 and publish it to SharePoint 2013, what will be your first database?
 
In part 2, we'll take a look at using the web app templates.

Tuesday, January 8, 2013

SharePoint: How Hard Can It Be?

Greetings!

Are you looking for SharePoint tricks (and tips) written in non-technical terms and designed for SharePoint end-users, power users, site owners, or other non-IT professionals? Then you’ve come to the right place.

In 2008, I was tasked with building a SharePoint site. Although I had no experience with SharePoint, web design, or HTML, I was determine to figure it out. After all, I once worked as a graphic artist at a newspaper. How hard could it be?

The most difficult part of building the WSS (SharePoint 2003) site was getting Flash to work. Today, Technet has a wonderfully simple article on how to implement Flash on a SharePoint 2010 site.

This blog is where I will document, for myself and for you, the troubles I encounter and the solutions I employ. If I ever get too technical, feel free to reach into your monitor and slap me silly. We end users/business users/power users have to stick together, learn together, and conquer together!

To submit blog topic, you can email sharepointmadam@gmail.com or find me on Twitter as @SharePointMadam.

Happy collaborating!

P.S. The SharePoint site I created in 2008 was a huge success! It has a new owner and new content now, but it's still widely used throughout the company.